Product Categories
- Arduino Shields
- Breakout Boards
- CAN (Controller Area Network)
- Connectors and Interconnect
- Drivers, DACs & Outputs
- FIRST Robotics Competition
- Formula SAE
- Hardware
- Interface and Logging
- Power Supplies and Distribution
- Qwiic Connect System
- R3aktor Data Acquisition
- Sensors
- Software
- Switches, Encoders, & Buttons
- Temperature Measurement
- Wire
- Discontinued
Tech Article Categories
Table of Contents
Posted: January 3, 2020
Modified: January 3, 2020
Home > Tech Article Categories > Interface and Communication > FIRST® CAN Networking
FIRST® CAN Networking
Introduction
Controller Area Networks (CAN) are commonly used in automotive, agricultural, and construction vehicles, as well as for industrial controls. FRC CAN buses are configured to operate at 1Megabit per second. This is in contrast to most industrial or automotive links that run 250kpbs or 500kbps. We benefit from higher data throughput by running a higher bus speed because FRC robots should never get anywhere near the 40 meter maximum bus length.
1Mbps will allow around 7,800 standard 8-byte messages with extended identifiers - also typically found with FRC devices. This sounds like a lot, and it is, but keep in mind that many devices send or expect certain messaging every 10 to 100 milliseconds. This gets you down to about 80 messages per robot control loop at the extreme. On a robot with 10 or more smart motors, IMUs and other sensors, we can actually start getting close to what’s theoretically possible on our CAN network. In short, don’t request more data from devices than you actually intend to use, especially if you found a way to install 15 motors on your robot!
Physical Layer
Electrically, the FRC CAN network is like any other. It’s a two-wire bus, designed to allow dozens of devices to talk to each other with a single network backbone that connects devices - also known as “nodes,” on the network.
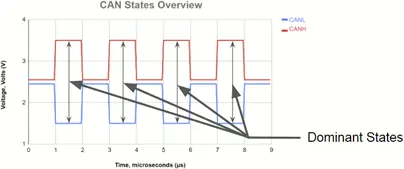
CAN is a differential bus, meaning the voltage difference between the “HIGH” and “LOW” lines is what differentiates between zeros and ones. The network lets only one device speak at a time. Message priority and collision detection are built into the physical protocol.

Termination
For a bus to function properly it needs a pair of 120-ohm resistors, one installed at each end of the bus. These act as a terminating impedance to bring the bus back to the recessive state and to absorb any electrical reflections in the network. You may not have realized it, but the roboRIO and PDP both have built-in terminating resistors to meet this requirement. The PDP resistor may be disabled by removing a jumper. The RIO’s resistor can’t be disabled, as it is meant to act as one end of the CAN bus. That said, If you have more advanced CAN networking needs, such as a motor, controller, or IMU mounted at the end of a long arm, you may need to disable the PDP terminating resistor and install your own at most extreme end of your network to meet the network design best practices. Whatever your layout, never have more than 2 terminators in your network.
Daisy Chain Topology
Now that we’ve covered the basics, let’s move on to network topologies. This topic tends to hold a sort of mythical status, but it’s actually fairly straightforward to implement a reliable CAN network on your robot. As we’ve already discussed, it’s basically a terminating resistor, followed by CAN-enabled devices, wiring, and at the other end, another terminating resistor. How you get there matters, however, so let’s start with the network topology that most people are familiar with, whether you know it or not, the daisy chain network.
This network topology is implemented by having two CAN connections per CAN device, and simply “daisy chaining” the network from device to device. In fact, most FRC CAN devices are like this, whether you’re talking about the RIO, PDP, or VRM with two, 2-pin CAN connectors or devices that come with two sets of CAN wires, like the Spark MAX, or Talons. This wiring and connector scheme is good for electrical noise by creating a long network with close to zero-length CAN nodes, and unless you put both the RIO and PDP on the same end of the network or unwittingly disable one (or both) terminating resistors, even the bus termination is trivial.
The downsides of the daisy-chain network topology are the relatively messy CAN wiring routing that you often end up with and the dreaded single-point-of-failure that’s capable of taking down much, or possibly all, of your CAN network. In this example, a break or loose connection to a single motor controller results in losing everything from that device onward - assuming that the bus is happy enough running with a single termination back at the RIO.
Multi-drop Topology
This brings us to our other topology option, the STAR network. Knowing what we’ve already discussed, we know that a network like this would be difficult to terminate properly and could cause reliability issues. What we’re really talking about is a short-drop architecture, allowed by the CAN standard, built off of a typical daisy chain network. The RoboRIO has the terminating resistor enabled, and is connected directly to the pneumatics module. This is where the usual ends, as the daisy chain output from the pneumatics module plugs into a 4-drop STAR distribution board that connects the left side Venom smart motors. The end connection of this STAR board is connected to an identical 4-drop distribution board that connects the right side bank of Venoms, as well as a CANterm terminating resistor to complete the network.

 CANstar 2-Drop
 CANdaisy 5-Link
 CANstar 4-Drop
 CAN Network 120-ohm Terminator Resistor