Product Categories
- Arduino Shields
- Breakout Boards
- CAN (Controller Area Network)
- Connectors and Interconnect
- Drivers, DACs & Outputs
- FIRST Robotics Competition
- Formula SAE
- Hardware
- Interface and Logging
- Power Supplies and Distribution
- Qwiic Connect System
- R3aktor Data Acquisition
- Sensors
- Software
- Switches, Encoders, & Buttons
- Temperature Measurement
- Wire
- Discontinued
Tech Article Categories
Table of Contents
Posted: March 6, 2025
Modified: March 6, 2025
Home > Tech Article Categories > R3actor and Arduino > SD Card with R3aktor
SD Card with R3aktor
Introduction
The R3aktor M0 Logger Board has a built-in micro-SD Card reader that can utilize a standard Arduino micro-SD card reader library. This tutorial will show you how to install the micro-SD card reader library and utilize its features.
Install Required Libraries
Open the Library Manager by selecting the library manager icon on the left.
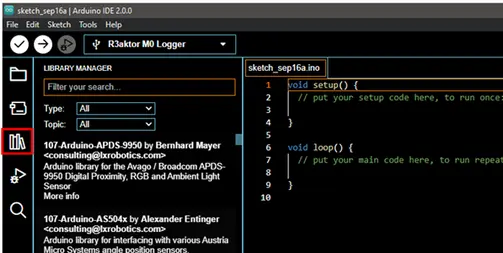
In the search box, type sd and make sure to set the Type filter to Arduino.
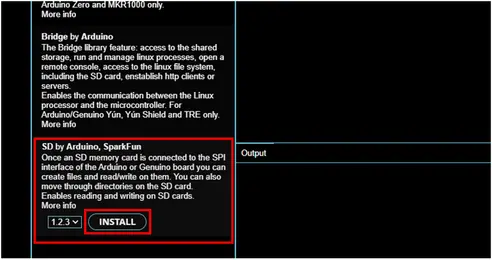
Hover your mouse over the SD by Arduino, Sparkfun library and select install. Wait for the process to complete.
Write Software
Copy the following code into the Arduino IDE:
- /*
- SD Card Example
- R3aktor M0 Logger Board
- Playing With Fusion
- Author: Noah Johnson
- September 16, 2022
- */
- #include <SD.h>
- File sdFile;
- void setup() {
- // Open serial communications and wait for port to open:
- Serial.begin(9600);
- while (!Serial) {
- ; // wait for serial port to connect. Needed for native USB port only
- }
- Serial.print("Initializing SD card...");
- if (!SD.begin(SDCARD_SS_PIN)) { // SDCARD_SS_PIN is the defined pin for the SD Card reader
- Serial.println("Initialization failed.");
- while (1);
- }
- Serial.println("Initialization done.");
- // ----- Writing to the SD Card ----- //
- // open the file SD.open("file_name", mode)
- sdFile = SD.open("PWF.txt", FILE_WRITE);
- // test if the file correctly opened and write to it
- if (sdFile == true) {
- Serial.println("File opened");
- Serial.print("Writing to PWF.txt...");
- sdFile.println("And you thought fire was dangerous...");
- // close the file:
- sdFile.close(); // Each file must be closed before another can be opened
- Serial.println("File closed");
- } else {
- // if the file didn't open, print an error:
- Serial.println("error opening PWF.txt");
- }
- // ----- Reading from the SD Card ----- //
- sdFile = SD.open("PWF.txt");
- if (sdFile == true) {
- Serial.println("File opened");
- Serial.println("PWF.txt:");
- // read data from file
- while (sdFile.available()) {
- Serial.write(sdFile.read());
- }
- // close the file:
- sdFile.close();
- Serial.println("File closed.");
- } else {
- // if the file didn't open, print an error:
- Serial.println("error opening test.txt");
- }
- }
- void loop() {
- }
Setup Hardware and Program
Insert a micro-SD card into the micro-SD card slot on the R3aktor board.
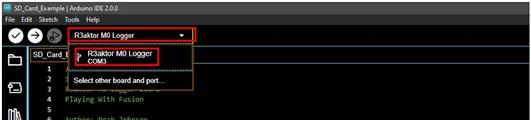
Connect your R3aktor M0 Logger to your computer via USB-C cable. Then, in the Arduino IDE, make sure you have selected Select Board -> R3aktor M0 Logger.
Upload the code by selecting the upload button and wait for the process to complete.

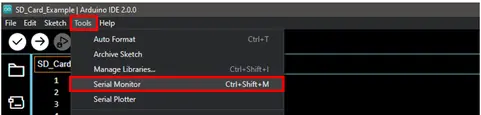
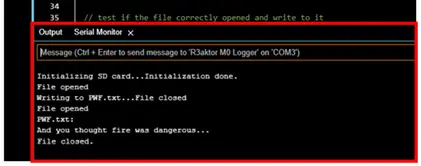
Now that the software is loaded onto the R3aktor, we can verify it is running by watching the Serial Monitor. Open the Serial Monitor by selecting Tools -> Serial Monitor.
The serial monitor will open at the bottom of the Arduino IDE window. If everything was done correctly, the output will be identical.
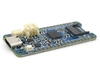 R3actor M0 Logger with SD Socket and Battery Charger
 R3aktor Core J-Type Thermocouple Data Acquisition Board
 R3aktor Core K-Type Thermocouple Data Acquisition Board
 R3aktor Core T-Type Thermocouple Data Acquisition Board
 R3aktor Core Universal Thermocouple Data Acquisition Board
 R3aktor Core PT100 RTD Temperature Data Acquisition Board
 R3aktor Core PT1000 RTD Temperature Data Acquisition Board